Markdown Cheat Sheet

Markdown allows you to write and format rich text using plain text formatting syntax. The basic idea is that it is a lightweight markup language that allows us to create richly formatted text. That will help you create an awesome GitHub README.
Tools that Support Markdown
You can use Markdown in any browser, even a plain notepad. There are some tools, however, that provide a real-time view (of markdown and rich text) side by side. The following are some of the tools that support working with markdown:
- VSCode
- Atom
- Haroopad
- Sublime text
- MarkPad
A few basic syntax rules have been detailed below:
1-Headings using #: We can write headings in markdown with the symbol # followed by the heading we want to write. The number of '#' symbols indicates the size of the header. The larger the number of '#' symbols, the smaller the header font size. There are a total of 6 heading types available in markdown.
Example:

# Heading1
## Heading2
### Heading3
#### Heading4
##### Heading5
###### Heading6
Output:

Heading 1
Heading 2
Heading 3
Heading 4
Heading 5
Heading 6
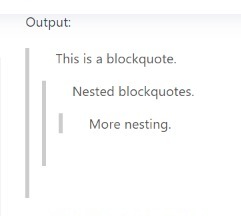
2-Text Styles We can use markdown to change the styles of selected text to different styles like bold, italics, blockquotes, underline, strike-through, etc.
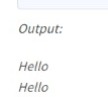
- Markdown Bold: We can make a text bold by enclosing the text between 2 symbols as -> text. We can also make it bold using the HTML “strong” tags. For example:
Method 1:
*Hello*
Method 2:
<em>Hello</em>
Output:

Method 1:
*Hello*
Method 2:
<em>Hello</em>
> This is a blockquote.
>> Nested blockquotes.
>>> More nesting.
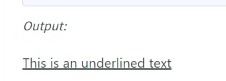
Markdown Underlined: We can underline a piece of text in Markdown using the HTML “ins” tag. Example: This is an underlined text Output:
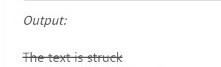
Strike-through: We can strike-through a piece of text in Markdown by enclosing the text inside double ~ symbol as -> text. Example:
~~The text is struck~~
Syntax Highlighting We can highlight code syntaxes using markdown by using a backtick(``) symbol before and after the code block. For multiline code formatting, we can also use 3 backticks for the purpose as illustrated in the example below.
Example for single line code:
This is an example of a `code` block.

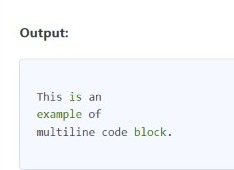
Example for multiline code:
This is an
example of
multiline code block.
Output:
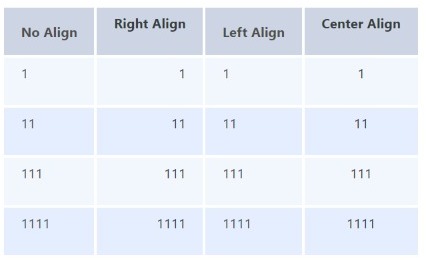
Markdown Tables We can create a markdown table with the HTML
| First Entry | Second Entry | Third Entry |

| No Align | Right Align | Left Align | Center Align |
| 1 | 1 | 1 | 1 |
| 11 | 11 | 11 | 11 |
| 111 | 111 | 111 | 111 |
| 1111 | 1111 | 1111 | 1111 |
[Link1] (https://www.interviewbit.com/practice/)

Images :
Images can also be added in markdown using methods similar to what we used for adding links.
Inline Style:
Inline Images are used to link images directly onto the current page to be displayed.
Syntax:
 Lists
Lists
There are 2 types of lists we can add in markdown,
- Ordered Lists: An ordered list defines a list of items in which the order of the items matter. Syntax:
- Element 1
- Element 2
- Element 3 Ordered List with Sublists: Lists can be nested into sublists to include items that are a part of a longer list. The example below shows how to implement nested unordered lists in markdown. Syntax:
- Level 1
- Level 2
- Level 3
- Level 4
- Level 3
- Level 2
- Level 1
- Level 2
Level 1
- Level 2
Unordered Lists:
We can create unordered lists with an asterisk(*), (+), or (-) signs as shown below:
With asterisk(*):
- Element 1
- Element 2
- Element 3
With minus(-):
- Element 1
- Element 2
Element 3
Nested Unordered Lists:
Unordered Lists can also be nested into multiple sublists beneath them similar to ordered lists. The example below shows how to implement nested unordered lists in markdown.
Syntax:
- Level 1
- Level 2
- Level 3
- Level 4
- Level 3
- Level 2
- Level 1
- Level 2
- Level 1
- Level 2
Escape Characters We can use a backslash() to escape literal characters.
Before escaping they will look like,
- Asterisk
\ Backslash
` Backtick
{} Curly braces
. Dot
! Exclamation mark
Hash symbol
- Hyphen symbol () Parentheses
- Plus symbol [] Square brackets _ Underscore Output:
This is the output that will be shown, if we just type the special characters directly, without using their escape sequences, we get the below output:
After escaping by using the \ symbol as:
* Asterisk \ Backslash ` Backtick {} Curly braces . Dot ! Exclamation mark # Hash symbol - Hyphen symbol () Parentheses + Plus symbol [] Square brackets _ Underscore Output:
This is the output that will be shown if we type the special characters along with their escape sequences.


